In Nov 2026, we announced the ability of document creators and editors to directly record audio atop their notation lines within patantara’s viewer. This post describes the details of how to use the feature. Please read through as there are some important prerequisites to consider without which recording efforts may not bear fruit.
- Who can record on notation
- A sample document
- The recorder panel
- Recording setup
- Recording
- IMPORTANT Save your recording
- What happens when you “Save”
Who can record on notation
If you are the creator of the document that you’re viewing when signed in, or are a designated editor, then the player controls that show up when you click on “Show tracks” will present recording controls as well.
A designated editor is one whose signed in email address is listed on the
document’s editors line. An example of the block that appears at the start
of such a document is shown below –
----
file name = The name of this document
editors = person1@somewhere.com
          person2@somewhereelse.com
...other properties...
----
If you’re signed in as person1@somewhere.com and are viewing this document,
then you gain the ability to record audio onto the notation lines in the document.
Note: As a designated editor, the document creator has granted you the trust to modify the document to improve or complete it. Recording on the notation lines of such a document will replace any existing recordings. Since the creator has granted permission explicitly, we leave it to you and the creator of the document to sort out the edits. In general, it is good idea to check with the creator before making such substantial changes to the document.
A sample document
We’ll use a simple document whose entire contents are given below to illustrate the process.
----
file name = Recording demo
tempo = 80 bpm
shruthi = D#
----

A document to demonstrate recording facilities for
document creators and editors. Lyrics by Sri Vaidheeswaran.
For the complete collection, search for "Vaidheeswaran collection"
on [https://patantara.com/notations][cat]

[cat]: https://patantara.com/notations


	tala pattern = || , , , , | , , | , , ||
    aksharas per line = 8

    S r G m P d N S+
    உண் மை பே ணும்  உள் ளம் கோ யில்

    S+ N d P m G r S
    உந் தன் உள் ளே வா ழும் தெய் வம்
The document above will look as shown below in the viewer.
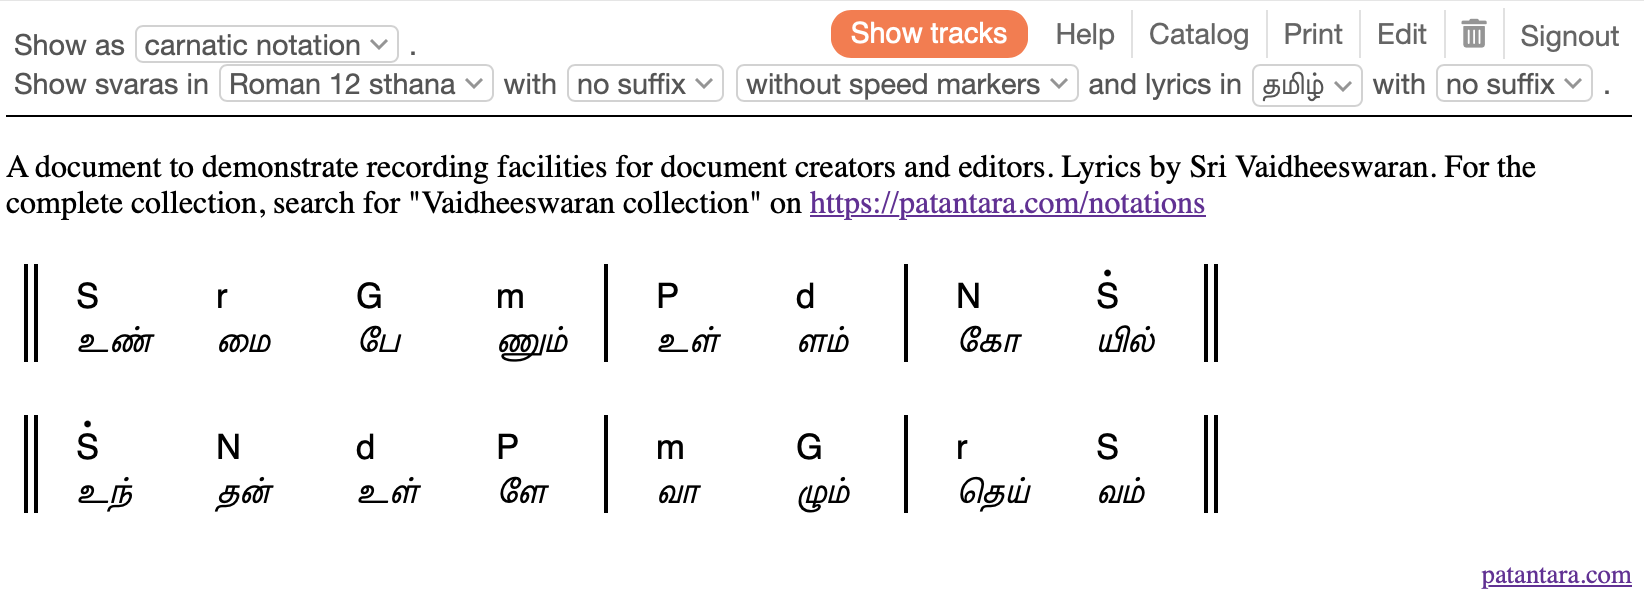
The document information
The first few lines within the ---- enclosed block (called the “front
matter”) declare some important properties of the document. For the purpose of
recording, the document must at least declare two properties –
-
tempo = NNN bpmwhich indicates the native tempo at which any recording is to be done. In the sample document, you findtempo = 80 bpmdeclared for “80 beats per minute”. -
shruthi = <pitch-name>which indicates the pitch at which the document audio is to be considered native. The usual western pitch names are usable in this field. In the sample document, you findshruthi = D#declared.
Other than the above, the document is otherwise like any ordinary Patantara notation document.
The recorder panel
When you click on “Show tracks”, the recording panel shown below will come up.
Clicking on “New track” will bring up a dialog to choose the track name and its properties. You will usually be working on tracks that have both shruthi and talam, but occasionally might also want to include speech associated with a line as when explaining how to pronounce lyrics. For such cases, switch off the “Follows the document’s shruthi” and “Recorded to the tala” options.
It is preferable to choose a short word to name your track, to keep the name easily readable within the recording and player panel. Once you do “Add track”, it will appear and be selected within the recording panel as shown below.
To record one or more lines, you first add them to the play list using the “add line” control that shows up when you mouse over a line (shown below).
You can add the lines in whatever sequence you wish to record them. You can also add a line multiple times in case you want to try a few times and keep the last attempt. This can give you opportunity to do a couple of practice rounds before you commit to a version. After recording a line, you may also record over it again to overwrite the earlier recording. The process is flexible to have a variety of such situations.
Recording setup
Before starting to record, it is important to complete the basic setup steps. Click the “Setup” button at the bottom of the recording panel.
Note: It goes without saying that recordings need to be done in a quiet enough environment, preferably in a studio.
-
Choose the input source from which you want to record. If you’re recording straight on your laptop using its built-in microphone, this ought to be simple. However few laptops have good quality microphones in them (Apple laptops being perhaps the best for this). So you may have an external microphone, in which case you’ll need to select the input source. Any “noise reduction” setting in your computer audio should be turned off for this purpose.
Note: Patantara’s recorder can only record mono audio.
-
The choice of output varies between browsers, with some of them choosing whatever output source is set at the system level, and others letting you choose. If you need to select it, do so. The audio output is used to playback lines already containing audio, the tala and the hint beeps if you’ve turned them on.
-
If you’re singing and need a shruthi reference, you can also set the volume of the shruthi to your comfort level in the setup panel. The tone will come on when you manipulate the shruthi volume slider and turn off when you release the slider. You should then turn on “Shruthi” in the recording panel itself.
Calibration
Since Patantara provides assistance in the form of tala and visual hints while recording, calibrating your audio setup becomes important.
What the calibration step does is to measure the time delay between triggering a sound on the chosen audio output and receiving the same sound on the selected audio input. This measured delay is then used to determine how to synchronize the visual and audio hints with your recorded voice or instrument.
The calibration step involves playing a few clicks of sound and recording them back. So the output sound must be made audible to the input device you have selected.
We recommend wired audio input/output devices and strongly recommend that you DO NOT use bluetooth devices for recording audio. This is because bluetooth devices introduce inordinate delays in the loop and are not designed for this kind of a purpose.
If you have, say, a MacBook Air, you can use the built-in microphone and wired headphones connected to the audio output jack of the laptop. With this setup, the calibration will need to be performed with the headphones unplugged because the output clicks will not be audible if the headphones remain plugged. Once calibrated, you can plug the headphones in to listen to the guide audio while you sing or play your instrument.
If you’re using an external wired (USB or headphone jack) microphone then similarly you will need to make sure that the computer’s audio output is audible to the microphone when calibrating. Once calibration is done, you can plug your headphones in to listen to the guide track.
To recap, here are the calibration steps –
For laptop microphone recording with wired headphones,
- Unplug headphones,
- Open “Setup”,
- Ensure output volume is sufficiently high,
- Click on “Calibrate”,
- If all goes well, the panel will record and show you a latency number,
- Plug your headphones back in,
- Click on “Use this setup”.
For laptop USB microphone recording with wired headphones,
- Unplug headphones,
- Open “Setup”,
- Ensure output volume is sufficiently high,
- Ensure microphone is close enough to the laptop for it to hear the output,
- Click on “Calibrate”,
- If all goes well, the panel will record and show you a ltency number,
- Plug your headphones back in,
- Click on “Use this setup”.
Recording
We assume you have headphones plugged in and the setup/calibration is done.
Turn on the hints that you need while recording.
- The “Tala” will play clicks that indicate the tala.
- The “Hint” will show a bouncing ball over either the svaras or the sahitya as the lines progress.
- The “Shruthi” will play a reference tone which is useful if the recording is that of singing.
Once you’ve added the lines you want to record to your playlist and turned on the hints you need, you can select the “Record” button at the bottom of the recording panel and press the play button to start. (Refer to the labelled Recording panel above.)
IMPORTANT Save your recording
Once your selected lines are recorded, the recorder will automatically stop. The recording is saved locally in your browser at this point, but not yet committed into the document. You may wish to listen to your recording to determine whether you’re satisfied with it or you want to re-record one or more of the lines. Repeat the process until you’re satisfied.
Once you’re happy with the result, click on “Save” at the bottom of the panel. This will add the recorded audio tracks to patantara and associate them with the document.
WARNING: In case you happen to close the browser window, don’t worry since the recordings are saved to your browser and opening the same document again under the same signin will restore the earlier recording made. It is also ok if you open another document and record audio for it without saving. Each document’s audio is stored locally in your browser’s storage, so it won’t be lost, but IF YOU CLEAR YOUR BROWSER’S STORAGE, THEY WILL BE LOST. So “Save” your recording as soon as it makes sense for you to do so.
What happens when you “Save”
“Saving a recording” behaves nearly identical to uploading an mp3 file in the editor and marking various lines to use the track associated with the file. So after recording two lines and clicking “Save”, it will look like this in the editor for this sample document –
	tala pattern = || , , , , | , , | , , ||
    aksharas per line = 8

    S r G m P d N S+
    உண் மை பே ணும்  உள் ளம் கோ யில்
    audio track for voice = voice-1 from 0.005s to 6.005s

    S+ N d P m G r S
    உந் தன் உள் ளே வா ழும் தெய் வம்
    audio track for voice = voice-1 from 6.013s to 12.013s

[voice-1]: audio-track://w7jCm23Cqs/HUADw4EZdc "Recorded 2026-11-06 23:19 #6ebfc4a46496ffbf"
The time stamp noted in the recording’s “name” is in UTC and not local time. This name is not visible in the viewer. Observe that 8 aksharas at 80bpm implies a line playback is 6 seconds long.
Note: You may notice that there appears to be a jump from 6.005s to
6.013s from the end of the first line to the start of the second line. This
is not a cause for concern. It is just the way the audio is sequenced into the
file. No portion of the recording is lost in the transition from one line to
another and they’re actually referring to the same moment in time. Just that
each line is stored separately so they can be stitched together for playback
seamlessly using short cross fades.
Subsequent takes for the same selected track will be labelled voice-2,
voice-3 and so on. So you can record multiple takes and then decide which one
you want to keep. You’ll see all the takes available like [voice-1]:,
[voice-2:], etc. at the end of the document. However, for a give selected
track, you have to choose one of them. So you can have only one audio track for voice =
line for each notation line you recorded.
The unused takes are not discarded, so you can choose to resurrect them at a later time if you want to.
- Notations
- Tala Keeper
- Talks
Twitter · RSS