In the previous post, we saw how to use a document that has audio tracks assigned to notation lines. In this post, we’re going to see how to go about creating such a document. Sticking with tradition, we’ll use examples from Gaṇarājēna Rakṣitōham for illustration.
Adding audio tracks to a notation document involves the following steps -
-
Decide on the track types you want for the document. A “track type” offers one view of a line of notation. For example, it could be a svara rendition, lyrics recitation, violin rendition, vocal rendition with sahityam, or a commentary.
-
Add mono audio files as mp3 files to the document and give them nick names. These files must contain the necessary audio for your various track types. It can be convenient to keep all audio associated with each track type in one audio file, so there will be, say, four mono audio files if you want four track types to be presented. It is also desirable that the shruthi of all of your recordings are aligned - i.e. do not have different shruthis for each track type like svara or instrumental.
-
For each line of notation, specify the portion of the audio file to be used for each track type. You do not have to specify all track types for all lines. Patantara will automatically indicate which lines have the currently selected track type. This also means it is fine for some lines to not have audio, so you can work incrementally.
-
At the document level, indicate the aadhaara shruthi in which your recordings have been made. This will serve as the reference point for the pitch shifter tool. If you do not specify this, the aadhaara shruthi will be assumed to be “C”.
-
At the document level, indicate which (if any) track types should not be subject to pitch shifting. For example, if you have a track giving a lyrics rendition, then it doesn’t make sense to permit it to be pitch shifted as that serves no purpose other than to distort the speaker’s voice. So you may want to disable pitch shifting for such a track.
In the tutorial below, we assume you know the basics of putting in notation on Patantara. If you do not, please refer to this post that shows you how to notate using Kalyani varnam as an example. Do go through that first if at any point you feel lost.
Going forward, we’ll assume you’ve prepared mono mp3 files for each track type. We’ll illustrate for a “vina” track type.
Adding an audio file to a document
Editors who have audio permissions can add audio tracks to the documents they create on Patantara. To do this, you simply “edit” a document and drag-n-drop the mp3 file you want to add into the editor area.
Use only mono files in the mp3 format.
You’ll then be asked to give a name to the file - where you can use a short word for it. The added file will appear at the bottom of the document as explained below -

Once the upload is complete, you need to concern yourself only with the track’s “nick name”. So remember that one.
Choose a short nick name for your file.
Recap on notation
For simplicity, let’s pick the first line of the song to serve as a reminder on how notation looks like in the editor.

Here we omit the line with descriptive notation for brevity as it adds no further information for the purpose of this post.
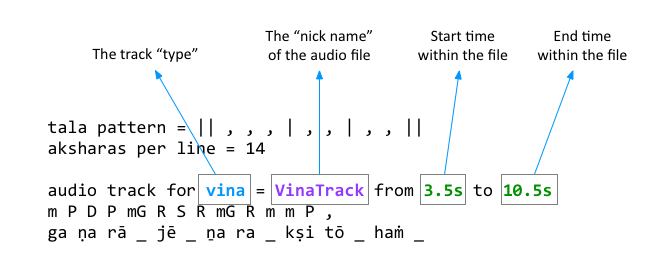
The above notation says that the tala is misra capu and 14 aksharas are being presented on each line - i.e. 2 avrtams per line.
Adding a vina track to the notation line
Remember the nick name you gave to the audio file you uploaded, it is time to use it. To associate a portion of that file for a particular audio track type for the line in the example above, you need to add a line specifying the “audio track …” property as shown in the example below -
-
The “vina” in “audio track for vina” gives the track type that will be shown in the player control as “Vina”. (The first letter will be automatically capitalized.)
-
The “VinaTrack” on the line is the nick name given to the audio file.
-
The “from” and “to” parts of the line say which portion of the file to attach to this line of notation. You can find these times using any standard audio editor such as Audacity.
A variety of form can be used to specify the time range within an audio file. Time can be entirely in seconds - such as “3.5s” or “723.4s”. You can also specify it using minutes and seconds - such as “6m23.3s”.
Does the line conform to the tala?
Some audio track types such as commentaries and lyrics recitations do not conform to the tala given in the notation line. For these, it would be unreasonable to subdivide the indicated time range automatically according to the tala divisions. You can indicate such lines using “with tala” or “without tala” as the case may be. If you omit either phrase, the line is assumed to conform to the tala.

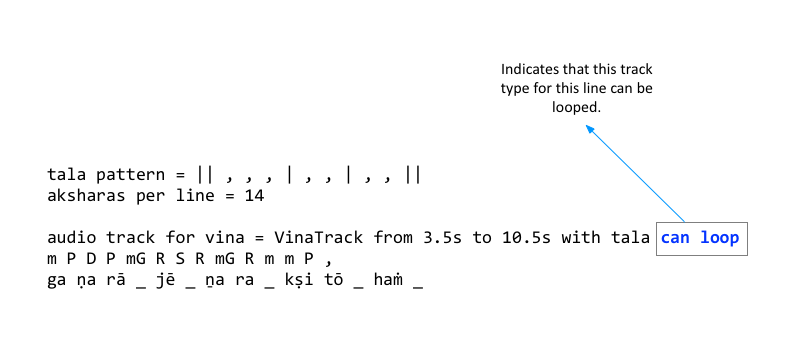
Does it make sense to loop the line?
For some audio track types such as commentaries, it may not make sense to loop it even if the loop option in the player is enabled. Looping is more of a practice aid and commentaries are not intended as practice material, for instance.
To indicate this aspect of a line, you can specify either “can loop” or “cannot loop” as shown below -
Adding more track types
Now that you know how to add one track type to a line of notation, specifying more track types is just a matter of adding more lines like that. The below extract from the krti’s source text shows how the four track types are associated for a line.

Specifying the aadhaara shruthi for the document
Every document can come with a “preamble” section into which some information pertaining to the document is placed and maintained by the system - for example, the file name can be overridden by writing a line in the preamble for “file name”. For more information about this “preamble section”, see this earlier blog post.
Similarly, the aadhaara shruthi for a document is also one such preamble entry named “shruthi”. The relevant portion of the header for our traditional document is shown below.

Specifying which track types don’t have the indicated shruthi
As mentioned earlier, lyrics recitals don’t have a particular shruthi associated with them. Same goes for solkattu tracks. For such tracks, it is useful to indicate to Patantara that these tracks don’t have a shruthi so that the pitch shifter can be disabled for them. Otherwise, the only effect obtained is a distorted voice without a musical or learning benefit.
You can give a comma-separated list of track types in the preamble for which you want to disable pitch shifting in the player controls.

In the above example, the “Words” audio track type has been marked to
prevent being pitch shifted. If, say, you also wish to prevent pitch
shifting of the “Svaras” track type, you need to write words, svaras.
Conclusion
That’s about it. Do always feel free to reach out to us if you face any issue with using Patantara.
While this process appears laborious, with practice it gets easier, and we’re also constantly thinking about how to make it easier for authors and students. Stay tuned on our blog for updates as usual.
… and wish you all a very happy and musical new year in 2018!
- Notations
- Tala Keeper
- Talks
Twitter · RSS